Friday, August 23, 2013
WPatrickEdwards: Mr. Lecount Gets Fitted For A Bonnet
WPatrickEdwards: Mr. Lecount Gets Fitted For A Bonnet: Le Count Ready For Fitting I have spent several days this week fitting the Lecount works to the case, which is assembled without the bon...
Thursday, August 22, 2013
Treasure Box #2 - Sawing and Dying Veneer
For our best pieces, we use sawn veneer. It is usually 10 time as expensive as sliced, but it is a better quality product.
When the veneer is sliced, it is often steamed or heated and the shearing of the knife damage the structure of the wood.
When the veneer is sawn, it is just like solid wood, just thinner.
Patrick Edwards did a good blog entry on sawn veneer with a video of one of the last veneer sawing comapny, near Paris, Georges et Fils.
To read the article it is here.
And for the video I will put a direct link
So we still have a bit of stock from when we had money, or when we have commission that require sawn veneer, we buy more than we need to provide for our specs.

the veneer is kept in a “cave à placage” a veneer cellar, Patrick likes to call it the veneer cave, it must sooth his primal instincts. The temperature has its importance but mainly we watch the moisture, that we keep around 60%.
The table is in a terrible mess as we dug into the veneer for the boxes and for a clock Patrick is making.
The table is in a terrible mess as we dug into the veneer for the boxes and for a clock Patrick is making.

We have veneer but we are low in dyed veneer, especially the greens. So, we have decided to cut some veneer.
We have only a old small delta, but with a resaw king blade and an improvied fence, it does work.
I tried couple spiecies to see how the blade react, and it is not always the haredst wood that are hard to cut. But in the hard wood selection, the maple is really a mean one.

when tuned up, even with an average quality bandsaw, but with patience, you can do wonders (not sure about the spelling of that one).
The veneer is 1/16”, like the one we buy in France.
We can not do yard wide veneers like in Paris but for marquetry packs, and not background this is perfect.
The veneer is 1/16”, like the one we buy in France.
We can not do yard wide veneers like in Paris but for marquetry packs, and not background this is perfect.

We have been experimenting with a pressure cooker to dye the veneers. It does work pretty well. I put it on twice a day until pressure has build up, and this for three days and it seems to be sufficient.

We use ALJO MFG. CO. and Lockwood’s water stain that Patrick had bought years ago.
When sanded a bit and cut into you can see that the color has penetrated to the heart of the veneer.
When sanded a bit and cut into you can see that the color has penetrated to the heart of the veneer.

We will carry on on the dying wood. The next step, is to dust my German to try to read AND understand that book about staining veneer.

For the green bone it is another story, and not a success yet. We tried to use the same technique and it appears the pigment size are to big to penetrate the cell of the bone. I will try transtint as it is a dye not a stain, and also the chemical approch with copper sulfate that I found in an old book

You can see that the stains grab very well on the outside even if it seems black, but inside….

I will let you know what happens!
Cheers
-- Patrice lejeune
Friday, August 9, 2013
Treasure Box #2 - Marquetry incrustation on assembly board - Assembling Marquetry video
It has been a while since I shared the progress on our box.
So here it is
Previously on Box series #2 inspired form that antique which remid us a bit of Gole's painting in wood.


And shaded them

For todays episode, there is first the background cutting.
It starts with glueing the design on the packs. The packs are a backer-board 3mm thick, grease paper, 4 layers of bloodwood sawn veneer, a front board and the design on top.

The background is cut on the chevalet

Like for the pieces, the pack is riveted with nails. The outside of the pack is taped the inside is nailed. NO nails in the background to keep.

There is inside background pieces marked with a red cross for easy identification when I cut and to remember to keep them. To keep them in place, I use what we call bridges, a link from the main background to the isolated pieces, like bridges to an island if the bridge was what kept the island in place

When we are done cutting, I take of the tape on the back first. I tape the pack while cutting, and especially the back, so it stays well in place, no pieces sticking out or vibrating.

Then i take of the tape from the front and start pushing gently the waste out of my background, being careful not to wedge them or to brake things.

I keep everything in a tray as it is hard at that point to be sure you haven’t broken any tiny pieces, so you want to keep everything for safety.

Then I open the pack with a razor blade, layer by layer, being carefull not to cut in the veneer but in between the layers. First the front board

Then the first layer of background, here is a close up where you can see the bridges again

Ready to start putting it together, the background pack goes in the press while putting the panels together so the veneer do not move, especially in a dry day.

I put glue on my assembly board, a nice thin layer, fast and clean.

And put the background face down.
We are building from the back, the background is glued face down on the paper what we see is the glue side.
The front of the marquetry will be the paper side. The paper and the glue will hold the marquetry together up to the moment comes to glue it to the actual piece of wood.
We are building from the back, the background is glued face down on the paper what we see is the glue side.
The front of the marquetry will be the paper side. The paper and the glue will hold the marquetry together up to the moment comes to glue it to the actual piece of wood.

And put it together


I did a video for you guys, and I must confess i am pretty proud of it.
Same for the second panel

Bridge on that one to

Opening of the pack

Set up your area

And put it together

Here are the two pictures with a bit of alcohol to see the result, I can never resist.


Next step is actually to build the box
Thank you for following
Thank you for following
Cheers
-- Patrice lejeune
Friday, August 2, 2013
Treasure Box #2 - Marquetry hot sand shading
It is time to do shading on those 2 first panels.
The first thing I do is put the sand to heat. We have a cast iron pan on a 1500W hot plate containing about 2 inches of very fine sand.
Second thing I do the shading map.
When I do it home at night, while watching TV I do get a little more artistic like for the Treasure box series #1

Here I did it at work and was more practical


The main action in shading is diping


Depending on the species of the wood and the thickness of the veneer, it takes more or less time to shade. Do not overdo it though, if it smokes, it is burnt.
This green for example takes time to reach the shading point, but then I have to be careful because when it starts, it is quick.

The angle you dip your piece also has its importance. The pieces on the left are dipped with a wide angle and away from the centre where the heat is greater. The more the angle the more the gradience of the shading. On right I put them straight in the sand and close to the center, for a short shadow.

Other example for the tree, I dip the root with an medium angle

When you dip with an angle do it on both side of the piece to have an homogenous exposure to the heat

The top part receive a shorter shadow so it is dip straight.
I want to add a bit of shading on the right side of the tree, so it looks like the light comes from the left and will give more volume to the piece.

But the root do not permit dipping, so it is time for spooning.

The same than for angle dipping shade both sides


A little video we did on spooning
here is the difference with or without spooning

Panel 1

panel 2

Both of them
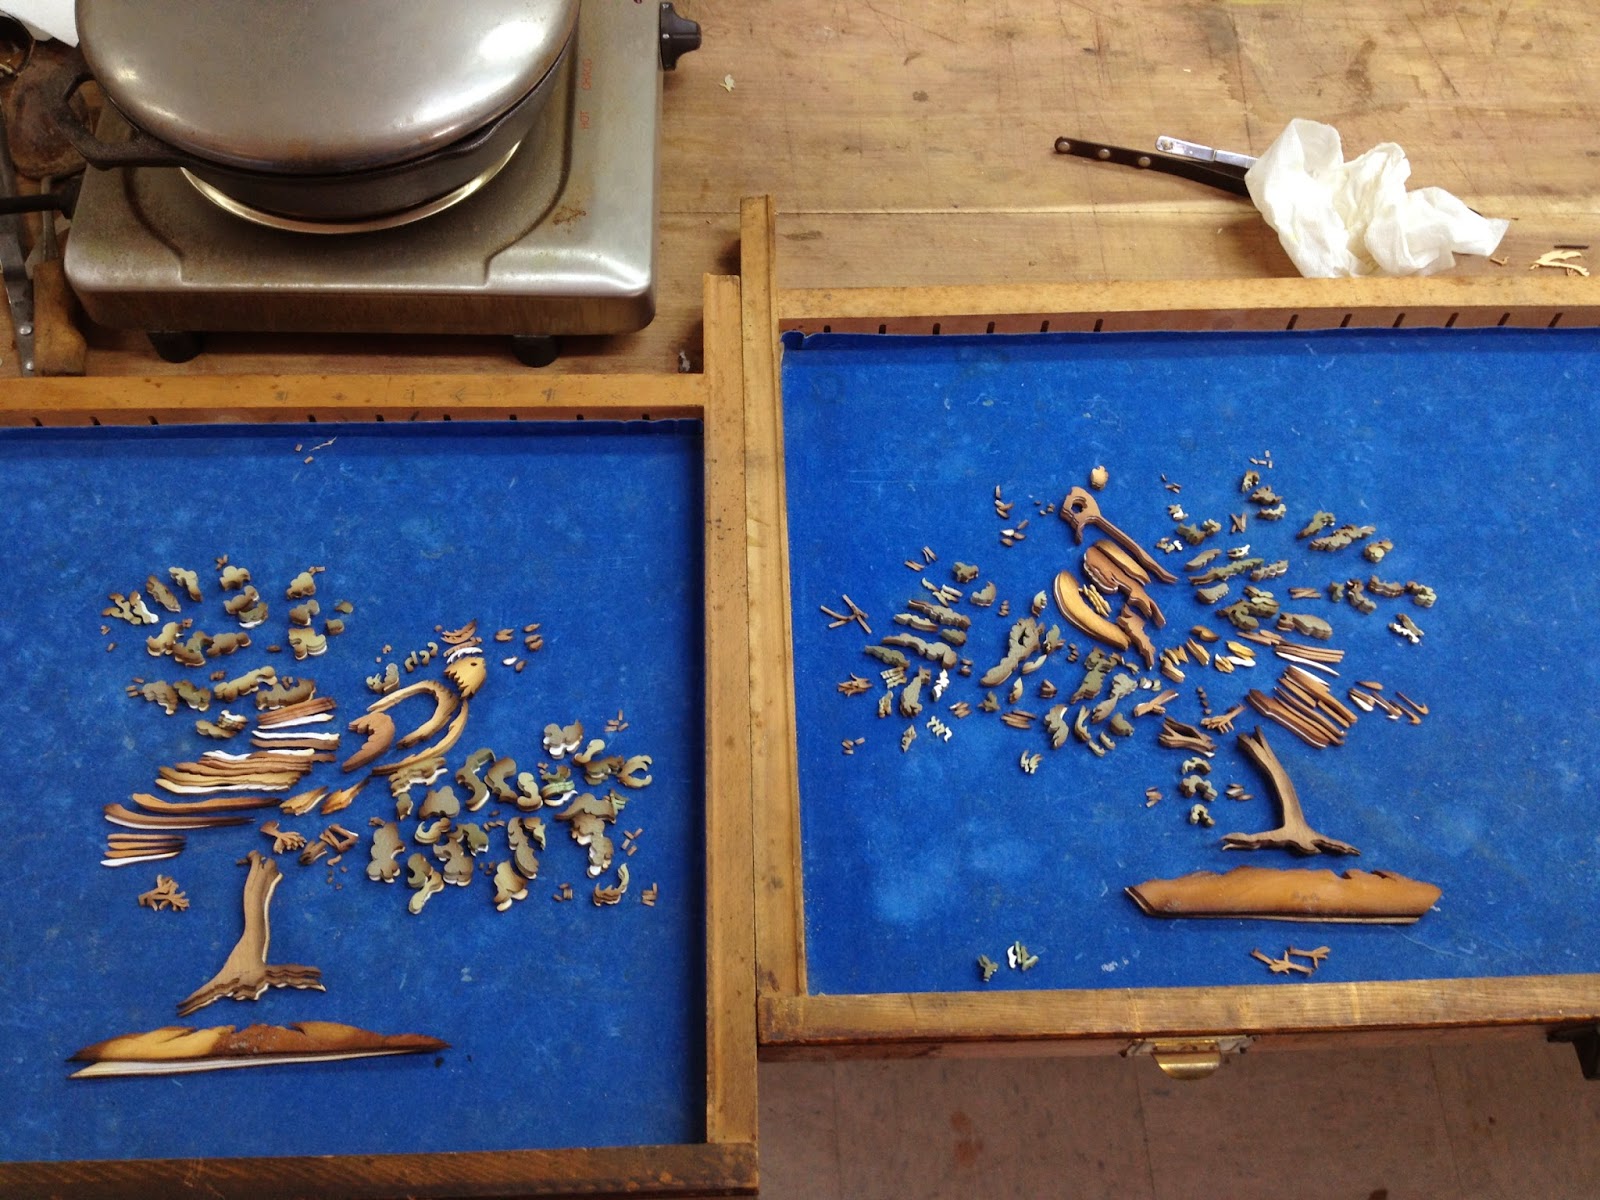
Detail of the Drawing and the pieces

Next step, cutting the background on the Chevalet

-- Patrice lejeune
Subscribe to:
Posts (Atom)